CONSTRUCTION

Construction & Fabrication
The construction of the Foundry Flask Punch-Out consisted mostly of fabrication done at Central Washington Universities (CWU) welding lab in addition to small machining tasks that were performed in CWU’s machine shop.
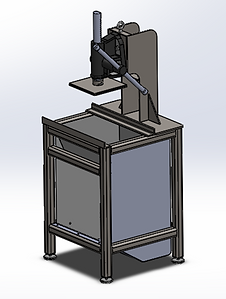
A majority of the framework for the Foundry Flask Punch Out consisted of 2”x2”x 3/16” wall steel square tubing. Attached to the main framework was a column the supports the arbor press that is made of ¼” steel flat bar. Below the column is a sheet metal basket that was made of 16 gauge steel.
Part 1- Material Planning
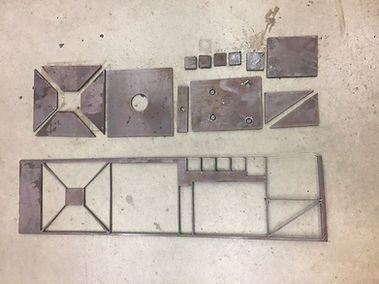
The design if the Foundry Flask Punch Out allows for manufacturability. Many of the members were designed so they could be ordered in there near net shape or easily cut to shape. Many parts on this project were designed to be cut with CWU’s plasma table. For example all of the members of the column structure are made from ¼” steel plate. This allows for all the members to be cut at once on the plasma table. The image below shows several parts that are nested into an area of 10” wide. This made it possible to order a ¼”x10” flat bar cut to length and have the ability to cut it on the plasma table.
Part 2- Sawing
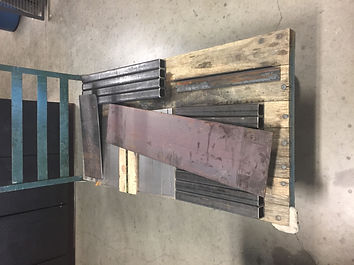
To begin the manufacturing process of the foundry flask punch out machine all the raw materials needed to be sawn to overall length. CWU has a horizontal hydraulic band saw that made quick work of cutting all the structural members to length.
Part 3 – Machining pre-fabrication
In a majority of the steel square tubing members there are tapped ¼-20 holes that allow for the mounting of the sheet metal basket. The drilling and tapping of these members was done before welding in order to allow for the use of a drill press. The only other parts that required machining was the punch out head attachment tube (part B-16) and drilling a hole to accept a clevis pin in the arbor press shank.
Part 4- Plasma Table Cutting
The use of CWU’s plasma table made quick work of producing parts. By nesting like parts in raw material they could be cut in one operation instead of multiple setups. Parts from the Foundry Flask Punch out were nested in Solidworks and then turned into a .DXF file for the plasma table to read.
In addition to the column components being cut on the CNC plasma table the sheet metal basket components were cut from their near net shape to their final shape.
Part 5- sheet metal work
After the sheet metal components were cut to shape mounting holes were drilled and the proper bends were made. Bending the sheet metal was challenging due to the equipment available at CWU. Several of the bends overlapped in the tooling setups which made it so some corners had to be bent back into alignment manually and hammered until flush with the existing bend. While inconvenient this process did not affect the final product or its function in the foundry Flask Punch Out machine.
Part 6- Welding
Welding of the Foundry Flask Punch out was one of the longest and most challenging tasks. While the process was not difficult in itself, ensuring alignment of all parts was. Most of the welding was done alone without a partner which made some structural members difficult to hold in place while welding. Overall the frame and attached column turned out very well.
Part 7 – Basket Assembly
Assembling the sheet metal basket proved to be challenging due to overly tight tolerances and the lack of weld reliefs. During the assembly of the basket weld reliefs had to be ground into certain areas using an angle grinder. This made it so the basket could be put in place and attached with ¼-20 bolts and washers.
Part 8 – Completed Fabrication
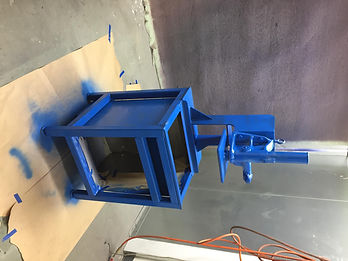
Part 9 - Painting Final Assembly